
Remote work has been a recent trend for the last couple of years, and it’s been popular in the professional world. In remote working culture, Zoom contributed a lot with its function to conduct meetings virtually. If you are a regular Zoom user and want to record meetings, stay with us and learn the best methods.
Zoom, the video conference tool, is trendy not only in the professional world but its impact in any business that consists of a small, medium, and a large volume of people. The cloud-based video conference service provides an excellent means of communication, while physical in-person meeting is impossible, and virtual is the only option.
If you do not know how to record a Zoom meeting, let’s learn the three best methods and start applying.
How to Record Zoom Meetings with EaseUS RecExpert?
What's in this article...
The software EaseUS RecExpert is dedicated to recording virtual meetings on your screen. Compatible with Windows and Mac, you can effectively record prolonged meetings, video calls, etc. The highly equipped tool can record from the webcam. And if you’re using the webcam overlay for tutorial videos, the tool gives you full support to record and save them on your PC storage. In addition, it offers a built-in trimmer option that helps you to trim the recorded video if you don’t want to keep unwanted parts. Further, for Mac users, it helps to record the entire screen or partial screen based on your requirements. The best part is it can record audio and webcam and supports various audio video formats, including MP3, MP4, AVI, etc.
The Benefits you’ll get :
- You can record PC screen, audio, and webcam, and the output file will be in high quality
- It can capture online conferences without time limits
- It offers a scheduled recording option to start and finish
- Other than Zoom, you can record Microsoft Teams meetings, Google Meet, and other online meetings
- It’s available for Windows 11,10,8,7 and macOS 10.13 for free download
- The software is perfect for novices as well as experts
EaseUS RecExpert provides the recording option if you’re not the host of the meeting but the participant. As the host can easily record the video, it’s difficult for the participants in the conference. EaseUS makes it easy for you. Let’s check
How to Record Zoom Meetings as a participant
To capture the video, you need not take the host’s permission. Follow the below steps:
Step 1: Install EaseUS RecExpert on your PC
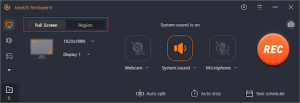
Launch the software on your PC, and run the program. Next, go to the meeting. Select “Full Screen” or opt for “Region ” mode.
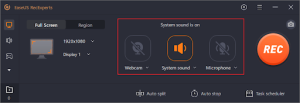
Step 2: Select the Audio system
Next, you must select the system sound from three options Webcam, System Sound, and Microphone. After the selection and when the meeting starts, click on the “Rec” button and start recording.
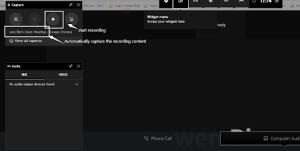
Step 3: Check the Pause and Stop button
![]()
When needed, check the button to Pause and Stop from the white vertical bar. Here you can use hotkeys “F10” And “F9” to pause and stop the capturing.
Step 4: View the recording
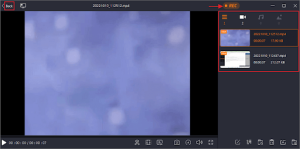
Once the recording is over, it’ll appear in the recording list.
While checking the recording file, you can use its built-in trim option if you feel like trimming a few parts.
How to Record Zoom Meetings with Enable Local Recording Option
Zoom offers a local recording option to its users. If you’re a participant or host, you can avail of the function. For example, you can record the meeting from your PC and save it on Dropbox, Google Drive, Or your PC storage. The local recording allows users to capture it in the Speaker view layout. However, it comes with a few limitations: without the host’s permission, you cannot capture the meeting.
How to Record?
Once the host grants the permission to record the video, follow the below steps:
Step 1: Begin the Zoom meeting as a Host
Step 2: Click on the “Rec” button
Step 3: A menu will appear; choose “Record on this Computer” from the menu. Here host can view the indicator at the top-left corner of the screen while the recording is going on.
Participants can also view the indicator during the recording.
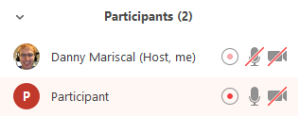
Step 4: Tap on “Participants” to check if other participants are recording the meeting.

Note: A Dial-in Participants option is there to inform that the meeting is being recorded
Step 5: Once the meeting is over, Zoom will convert the recording to access the file
Step 6: After the conversion, the folder will be open for you so that you can check the file
Remember, the host can disable the recording option anytime if he feels and you cannot start it without permission.
How to Record Zoom Meetings on Windows 10
If you’re not a permission-taking guy but want to continue the recording, Windows 10 can help you. Windows 10 offers a built-in screen recording feature Xbox Game Bar. You can use it to capture your PC screen and record the meeting without taking permission from the host. So let’s learn the technique.
How to capture the PC screen?
Follow the simple steps:
Step 1: Go to the meeting, press Win+ G together, and open it.
Step 2: Once it opens, it’ll let you know the host’s name’s zoom meeting; click on the “Recording” button
Alternatively, press Win + Alt + R and start the meeting recording. Once the meeting is over, click on the “Stop” button.
Bottom Line
The virtual meetings option is handy when participants stay away, but you need to connect to your team members. Zoom provides a valuable service that adds productivity to the remote work culture after removing the distance between the team members. If you are a participant and want to record the meeting for repeat watch, install EaseUS RecExpert and capture the sessions. However, you can also use the other options to capture your Zoom meetings based on your requirements.